
How to Make a DIY Bucket Hat


This DIY bucket hat is super easy to make at home. We love bucket hats because they look good with everything. It's a great project for recycling old clothes.
Learn to make a DIY bucket hat from things lying around the house. Wear your bucket hat on walks, to the beach or just out for groceries. It’s one of those everyday pieces that you can keep on repeat.
Fabric Suggestions:
- Old jeans
- Linen
- Towel fabric
- Canvas
- Patterned lining
Supplies:
- Sewing machine
- Thread
- Scissors
- Recycled fabric
- Compass or 8” diameter bowl
Measurements:
Top of hat: 2 of 8” circle (use a bowl or a compass to help you draw your pattern)
Headband: 4 of 3” x 6” on the fold (total 12”) pieces
Brim: 4 of 4” x 12” x 18” (following a curved 7.75” circle shape)

Bucket Hat Instructions
1. Sew the short edges of the headband
This is a simple straight stitch. Make sure the sides of the fabric that will be visible face each other. Do this on both sides. Since you have four pieces, you’ll end up with 2 headband loops. One is for the interior and the other is for the exterior of the hat. When you are done, iron the edges flat for polish. Do this for all seams you create.
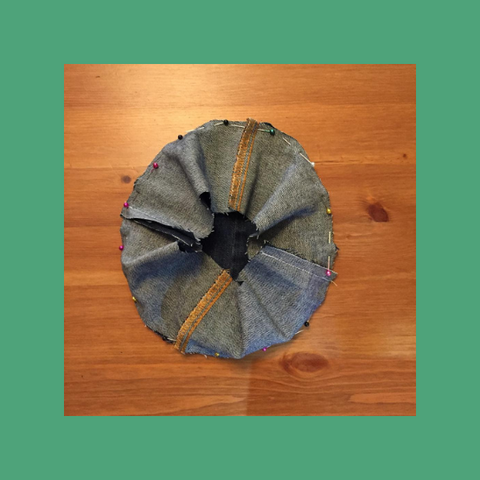
2. Pin the headband to the top of the hat
Pinning helps you match the fabric shape accurately. Do this with both headbands and top of hat pieces.
3. Stitch the headbands to the top of hat pieces
Stitch about a quarter inch from the seam around the area you pinned for both sets of fabric. This is your first curved stitch. Go slowly and carefully.
4. Stitch the straight edges of the brim pieces
Again, this is a simple straight stitch. You’ll need to make sure the visible sides of the fabric face each other. Do this for both sets of fabric. You’ll have two brim loops in the end. If it looks like you’re making two hats, you’re following the instructions correctly.

5. Pin the inner ring of the brim to the bottom of the headband
It’s best to start on the seam you created. You can line it up with the headband seam as well to look more professional. Do this for both hat shapes of fabric.
6. Stitch the brim to the headband where you’ve pinned it.
Stitch carefully to make sure that your pieces line up correctly. This is the second curved stitch. On curved stitches go slowly to follow the edge and avoid stitching over the excess fabric. Stitch about a quarter inch from the edge of the fabric.
7. Pin the outer brims together with the visible fabric sides facing each other.
In this step you’ll simply pin the two hat shapes together. They will join at the outer edge of the brim to create your interior and exterior hat sides. Leave about 4 inches along the side of the brim unpinned. This is the gap you’ll use to push the fabric through to the reverse side after it is stitched.

8. Stitch along the outside of the two brims leaving 4 inches unstitched.
Again, this is a curved stitch, so you’ll want to go slowly and carefully to make the correct shape. After you have stitched the exterior side of the hat, cut perpendicular lines into the fabric about every inch, to allow the brim to lay flat more easily when you turn the hat inside out.
9. Turn the fabric inside out, by pushing it through the unstitched gap.
For this step, both of the sides that should be visible will now appear. Use your hands to shape the two pieces so they align and create your hat shape. Iron flat the edges of the outer brim. You’ll still have a 4 inch flap that hasn’t been stitched yet, Use your iron to fold this flap inward, so you can stitch the gap shut.
10. Stitch the gap shut and add finishing touches.
After you stitch the gap shut, you can try your hat on to make sure it fits. If it fits properly, you’re ready to add finishing touches. Stitch parallel rings around the entire brim about ¼ inch apart to make it a sturdy shape. Start from the outer edge and work your way inward toward the headband. After you’ve made these stitches, your bucket hat is ready to wear.

Show us your finished bucket hat in the comments.
Get the whole look by pairing your bucket hat with our Goodfair Surprise Hawaiian Shirt.
--
Blog post written by Erica Eller